丝滑迁移四百余台服务器的业务IP和IPMI网络
由于国测和等保三级认证,某IDC机房需要根据业务级别对服务器分区,由于服务器数量较多,影响范围较大,所以留给我们的维护窗口非常紧张,下面记录博主如何用一系列骚操作将预计7天的维护窗口缩短到2个工作日。
前期准备
准备工作至关重要,大致可以分为网段规划和服务器纳管两个方向,可以并行推进
网段规划
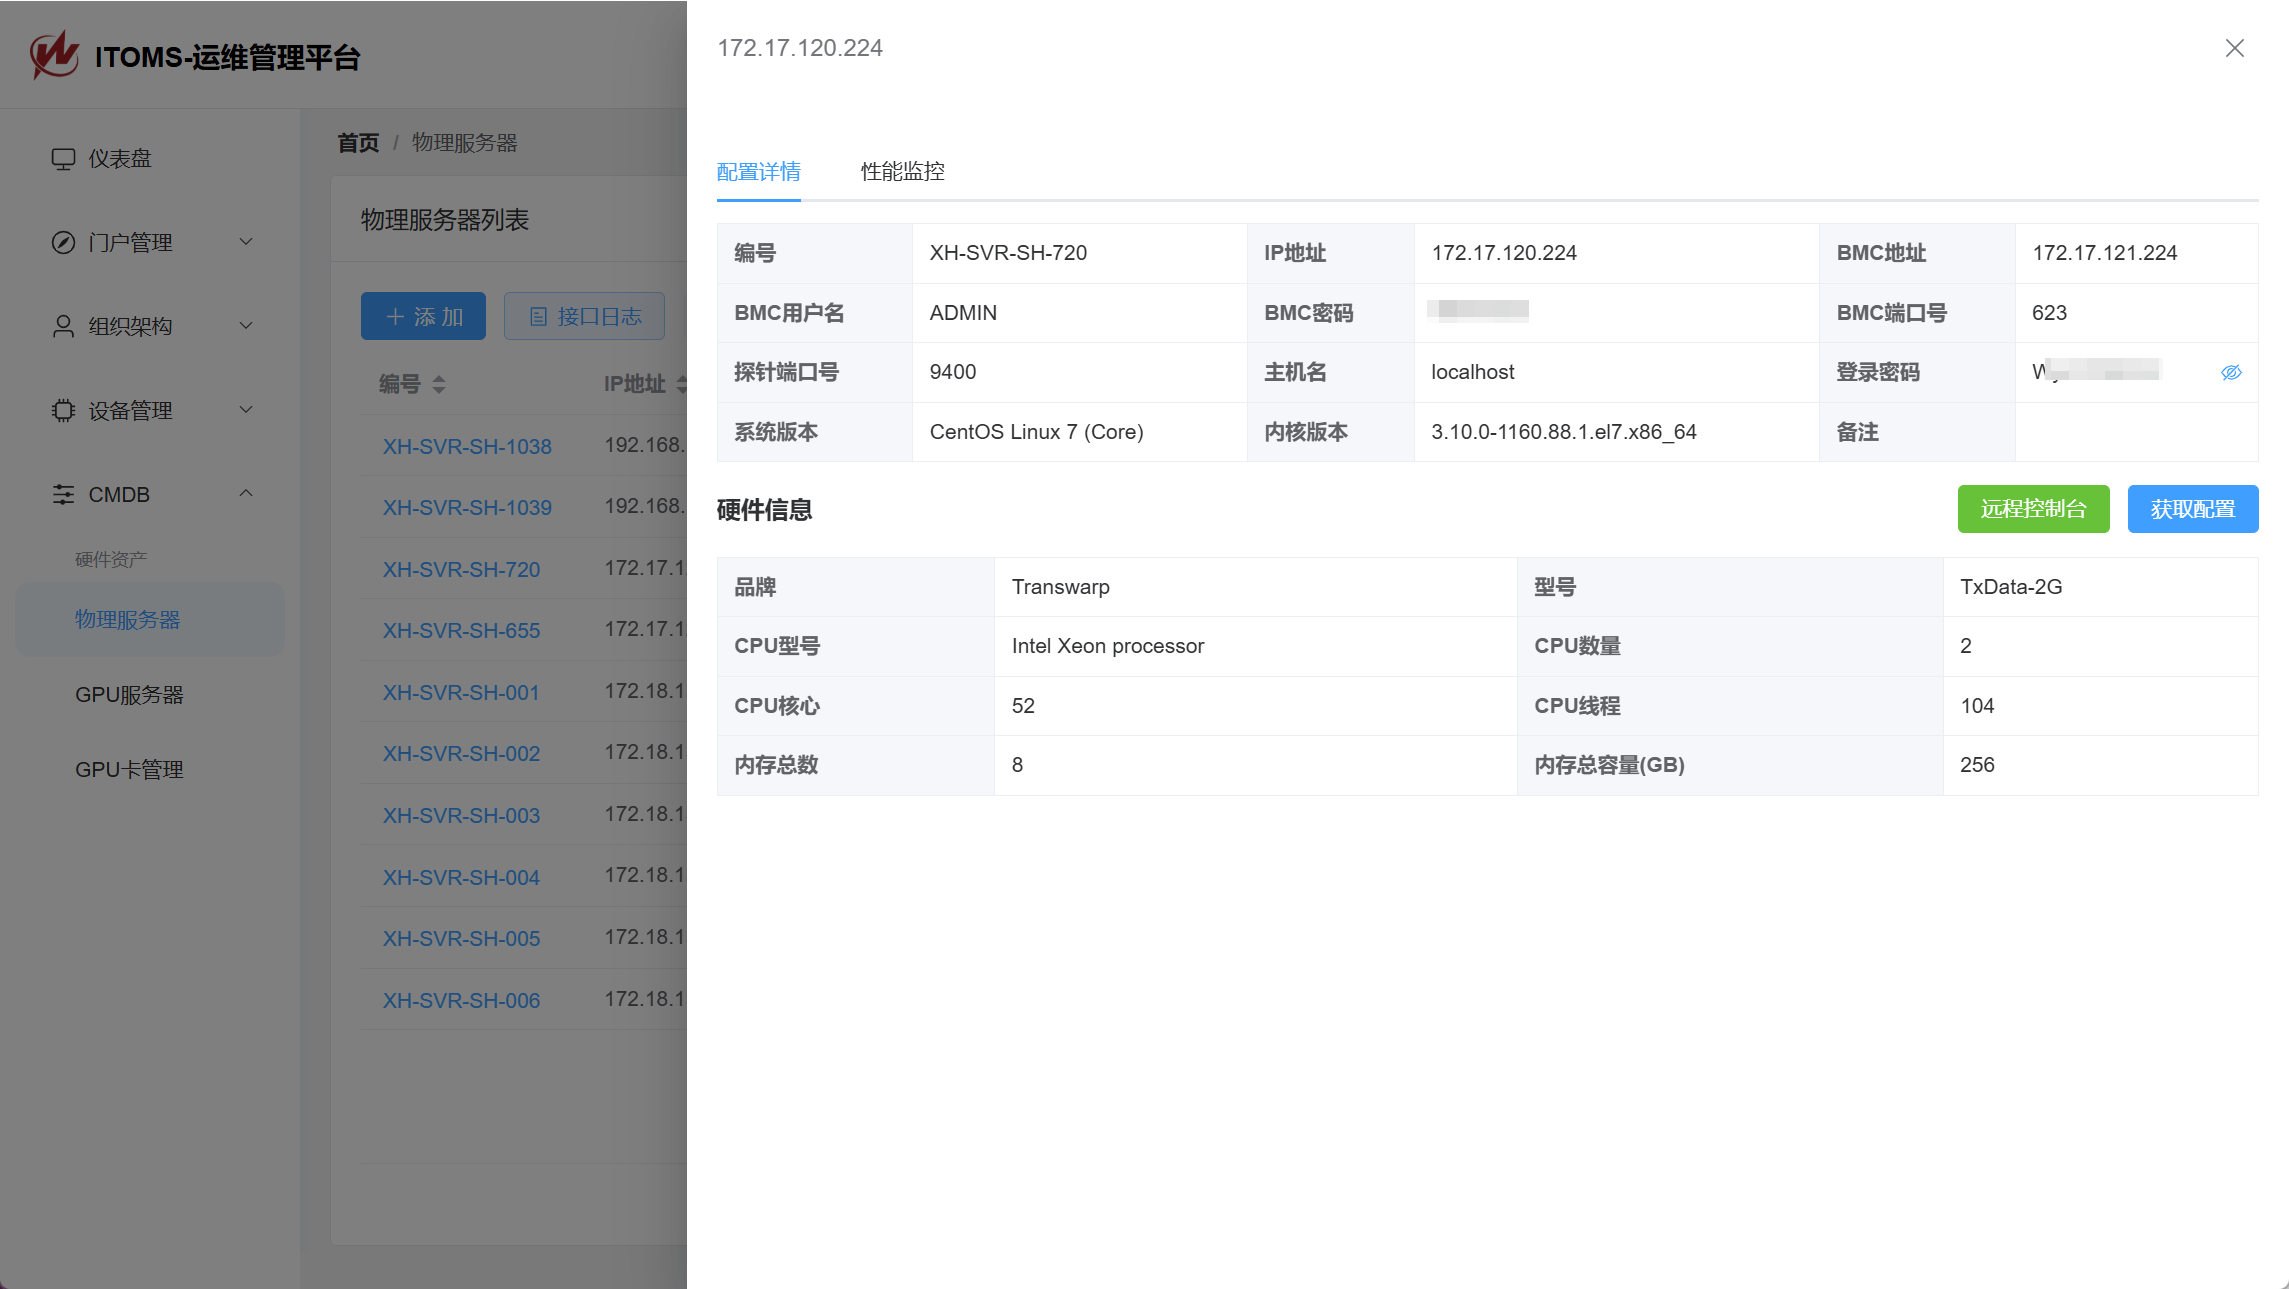
在开展这部分工作前需要从资产系统中导出一份服务器资产明细表,然后与各个Team的服务器owner和maintainer确认密级信息,最后根据密级信息和服务器物理位置,结合机柜可视化划分出红黄蓝三个逻辑隔离区域,关于区域定义在这里不展开详谈,参考等保要求标准即可。准备完成后,最终输出一张服务器规划明细表,需要包含我们后续需要依赖表格进行命令拼接以及结果匹配,所以表格中的数据至关重要,需要确保准确无误。
服务器纳管
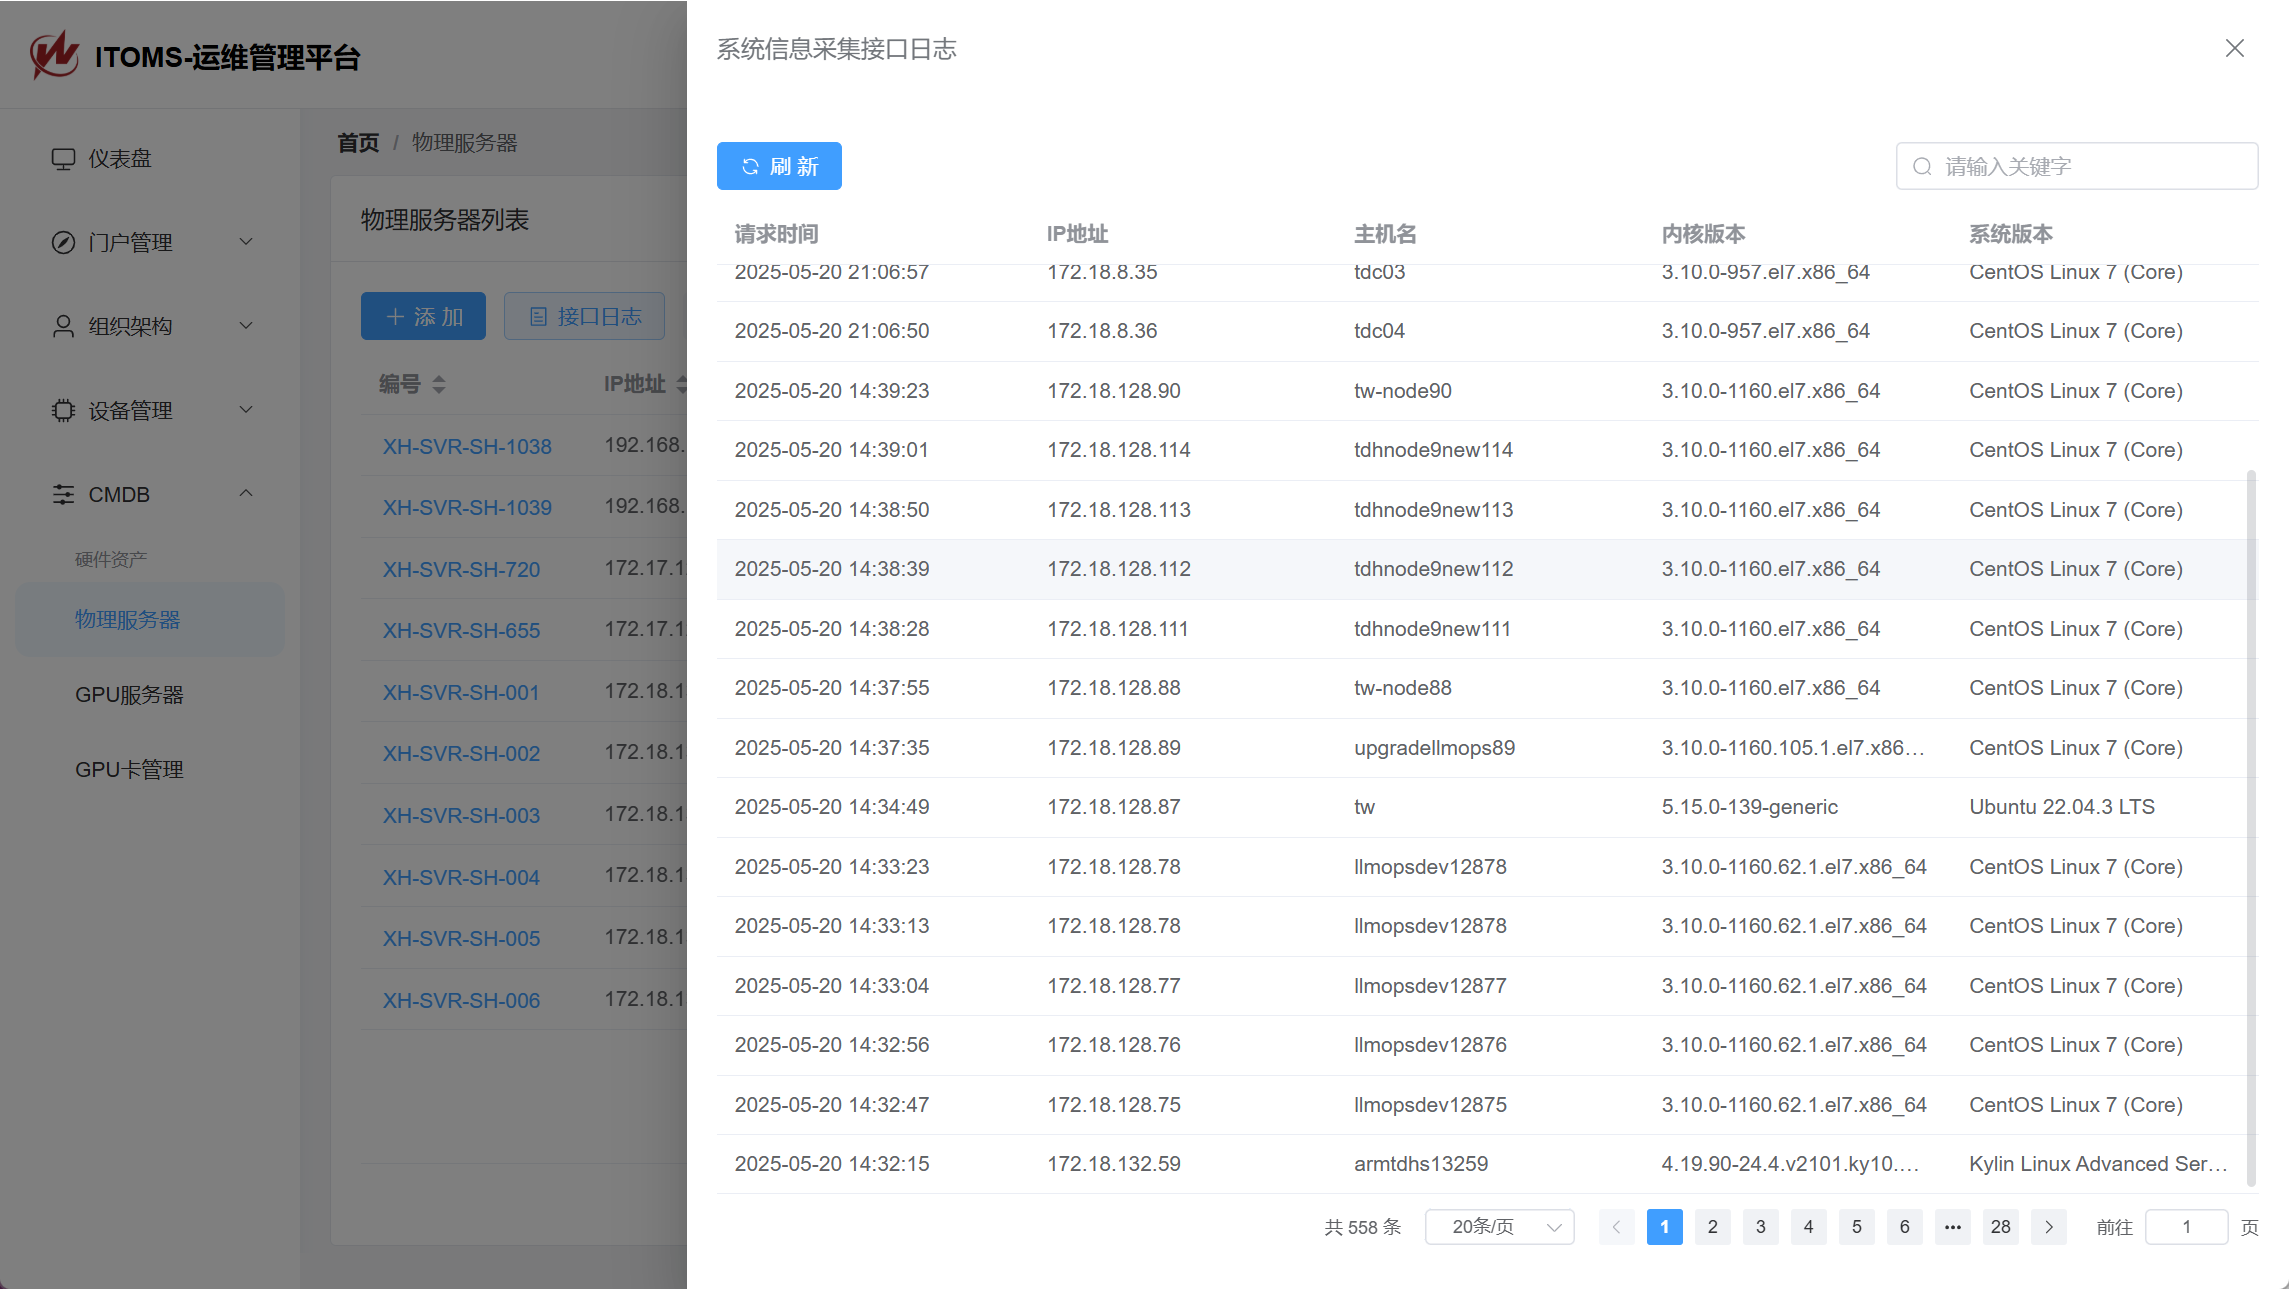
这部分工作有一个背景要提前说明下,由于历史遗留问题,该机房的服务器都是各部门自管,并没有统一纳管到CMDB中,所以我们首先需要确保有一个统一的权限可以控制这些机器,为后续使用ansible或saltstack提供必要条件。这里我的设计是依赖shell脚本实现,通过shell脚本创建一个登录密码为10位强随机的it用户,同时配置密钥登录,设置sudo权限,然后将相关信息通过http回传给CMDB服务器记录下来。(注意这里的ssh私钥和IT密码数据库密级较高,一定要妥善保管)
shell脚本细节如下:
IT_USER="it"
PASSWORD=$(openssl rand -base64 15 | tr -dc 'a-zA-Z0-9' | head -c 10)
SSHDIR="/home/$IT_USER/.ssh"
PUBKEY="ssh-rsa ******公钥内容******"
# 回传接口
LOG_SERVER="http://172.16.20.41:8000/v1/system_collect/"
FLAG_FILE="/home/$IT_USER/ituser_done"
function display_error() {
echo "Error: $1" >&2
rollback
exit 1
}
function create_user() {
if ! grep -q "^${IT_USER}:" /etc/passwd; then
useradd -m -p $(openssl passwd -1 "${PASSWORD}") "${IT_USER}" || display_error "Failed to create user '${IT_USER}'"
chown -R ${IT_USER}:${IT_USER} /home/${IT_USER} || display_error "Failed to set ownership of /home/${IT_USER}"
fi
}
function setup_pubkey() {
if [ ! -d "$SSHDIR" ]; then
mkdir -p "$SSHDIR" || display_error "Failed to create SSH directory"
fi
if [ ! -f "$SSHDIR/authorized_keys" ]; then
touch "$SSHDIR/authorized_keys" || display_error "Failed to create authorized_keys file"
chmod 600 "$SSHDIR/authorized_keys" || display_error "Failed to set permissions for authorized_keys file"
fi
if ! grep -qF "$PUBKEY" "$SSHDIR/authorized_keys"; then
echo "$PUBKEY" >>"$SSHDIR/authorized_keys" || display_error "Failed to import public key"
chown -R "$IT_USER" "$SSHDIR" || display_error "Failed to change ownership of SSH directory"
chmod 700 "$SSHDIR" || display_error "Failed to set permissions for SSH directory"
fi
}
function configure_sshd() {
if ! grep -q "^[[:space:]]*PubkeyAuthentication[[:space:]]+yes" /etc/ssh/sshd_config; then
sed -i -E 's/^[#[:space:]]*PubkeyAuthentication[[:space:]]+no/PubkeyAuthentication yes/' /etc/ssh/sshd_config || display_error "Failed to configure SSHd"
systemctl reload sshd || echo "Please restart sshd service manually."
fi
}
function configure_sudoers() {
if ! grep -q "^${IT_USER} ALL=(ALL) NOPASSWD: ALL" /etc/sudoers; then
echo "${IT_USER} ALL=(ALL) NOPASSWD: ALL" >>/etc/sudoers || display_error "Failed to configure sudoers"
fi
}
function rollback() {
if grep -q "^${IT_USER}:" /etc/passwd; then
userdel -r "$IT_USER"
fi
}
function main() {
if [ "$EUID" -ne 0 ]; then
display_error "You must be root to run this script"
fi
#IPADDR=$(hostname -I | awk '{print $1}')
IPADDR=`ip addr | grep 'state UP' -A3 | grep -E '172\.(16|17|18|26)\.' | grep -v '172\.17\.0\.' | head -n 1 | awk '{print $2}' | cut -f1 -d '/'`
HOSTNAME=$(hostname)
KERNEL_VERSION=$(uname -r)
OS_VERSION=$(cat /etc/os-release | grep PRETTY_NAME | cut -d= -f2 | tr -d '"')
if [ -f "$FLAG_FILE" ]; then
PASSWORD=$(cat "$FLAG_FILE")
curl -X POST -d "ip=${IPADDR}&hostname=${HOSTNAME}&password=${PASSWORD}&kernel=${KERNEL_VERSION}&os=${OS_VERSION}" "$LOG_SERVER"
echo -e "\nSetup has already been done. Exiting."
exit 0
fi
create_user
setup_pubkey
configure_sshd
configure_sudoers
echo "$PASSWORD" >"$FLAG_FILE" || display_error "Failed to write flagfile."
curl -X POST -d "ip=${IPADDR}&hostname=${HOSTNAME}&password=${PASSWORD}&kernel=${KERNEL_VERSION}&os=${OS_VERSION}" "$LOG_SERVER"
echo -e "\nAll done. Exiting."
}
main将脚本通过http发布出来,然后推给服务器owner执行即可
curl -Ls http://172.16.20.16:8080/deploy_ituser.sh | bash在服务器上执行脚本后,我们便可以在后台查看到对应的执行记录和it用户随机密码。
Inventory文件
本次批量迁移主要依赖ansible实现,所以在开始之前,我们还需要准备好inventory配置,这里主要是在前面准备好的网段规划明细表中进行命令拼接(在这里再次鼓吹一下Excel,用公式来批量拼接SQL、Shell脚本、inventory,真的屡试不爽)
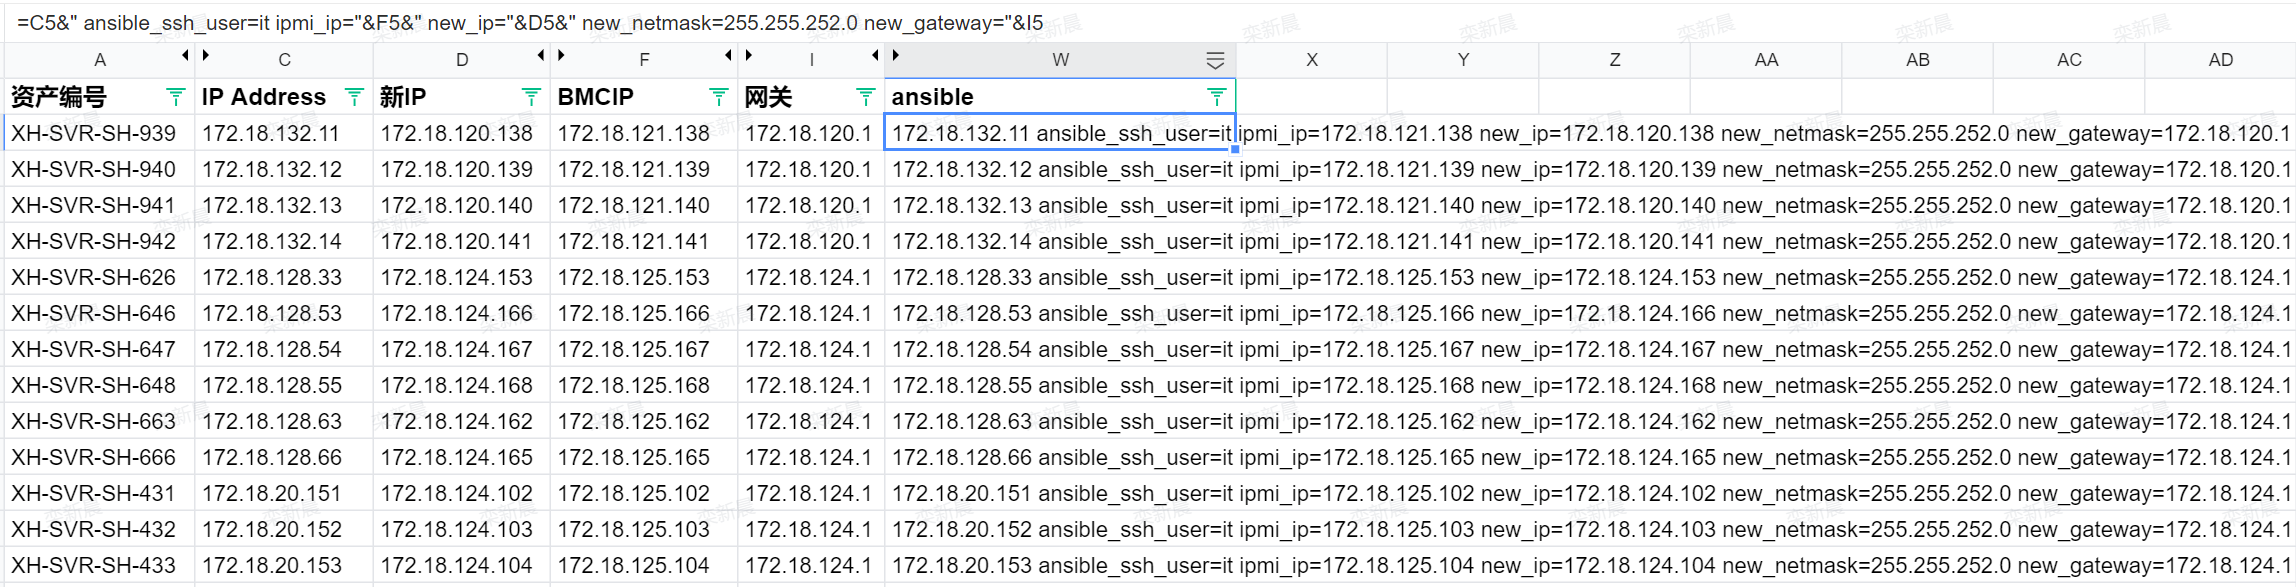
这里主要拼接几个关键字段、分别是原IP、新IP、新BMCIP、以及新网关IP和子网掩码,将拼接完成的内容保存为inventory配置文件,例如cluster_hosts:
[servers]
172.18.132.98 ansible_ssh_user=it ipmi_ip=172.18.141.25 new_ip=172.18.140.25 new_netmask=255.255.252.0 new_gateway=172.18.140.1
172.18.132.99 ansible_ssh_user=it ipmi_ip=172.18.141.26 new_ip=172.18.140.26 new_netmask=255.255.252.0 new_gateway=172.18.140.1
172.18.132.100 ansible_ssh_user=it ipmi_ip=172.18.141.27 new_ip=172.18.140.27 new_netmask=255.255.252.0 new_gateway=172.18.140.1
172.18.132.101 ansible_ssh_user=it ipmi_ip=172.18.141.28 new_ip=172.18.140.28 new_netmask=255.255.252.0 new_gateway=172.18.140.1
172.18.128.37 ansible_ssh_user=it ipmi_ip=172.18.141.33 new_ip=172.18.140.33 new_netmask=255.255.252.0 new_gateway=172.18.140.1
172.18.128.38 ansible_ssh_user=it ipmi_ip=172.18.141.34 new_ip=172.18.140.34 new_netmask=255.255.252.0 new_gateway=172.18.140.1
.......
inventory准备完成后,我们可以新建一个简单的playbook用来测试连接情况
  - name: PING Test
    hosts: servers
    gather_facts: no
    tasks:
    - name: Connection Test
      ping:
然后验证结果,确保所有服务器都正常可控
ansible-playbook ping.yml -i cluster_hosts迁移过程
由于本次迁移涉及到IPMI网络,而IPMI网络对业务网络不产生影响,而且后续业务网络迁移过程一旦意外中断,我们还需要依赖IPMI进行离线维护,所以这里优先迁移IPMI网络。
IPMI网络迁移
这里主要使用ipmitool实现修改,我们先使用ansible对所有目标节点安装ipmitool工具:
- name: Install ipmitool
hosts: servers
gather_facts: no # 不采集节点信息,可以显著提升执行速度
become: true # 使用sudo提权
tasks:
- name: Install ipmitool
yum:
name: ipmitool
state: presentansible-playbook ipmi_install.yml -i cluster_hosts这里的踩坑点:我们可能会遇到yum/apt源、网络、依赖冲突等各种问题,需要根据执行结果筛选出执行失败的服务器,然后逐个手动解决,这里也是耗时最长的一个环节。
ipmitool依赖安装完成后,开始批量迁移ipmi网络
- name: Update ipmitool
hosts: servers
gather_facts: no
become: true
tasks:
- name: Set IPMI IP address via ipmitool
shell: >
ipmitool lan set 1 ipaddr {{ ipmi_ip }}
when: ipmi_ip is defined
ignore_errors: true
- name: Set IPMI netmask via ipmitool
shell: >
ipmitool lan set 1 netmask {{ new_netmask }}
ignore_errors: true
- name: Set IPMI gateway IP address via ipmitool
shell: >
ipmitool lan set 1 defgw ipaddr {{ new_gateway }}
ignore_errors: true
这里的踩坑点:我这里在ipmitool命令中将channel ID写死为1,实际有少量品牌的服务器可能会是不同的channel,例如联想和华为的channel就是3或8,我也是后面才发现,解决也很简单,根据执行结果,将失败的服务器筛选出来,修改channel后再单独执行一遍就行。后续优化可以将channel ID也作为变量传入playbook即可避免。
在IPMI网络变更完成后,网络同事介入,修改IPMI端口对应VLAN,然后批量检测IPMI上线情况,确保带外管理正常后即可继续迁移业务网络。
业务网络迁移
IPMI迁移完成后,开始迁移业务网络,这里需要区分一下操作系统版本,例如我这里迁移的环境主要包括CentOS\Ubuntu\PVE虚拟平台等
RHEL/CentOS
- name: Update RHEL/CentOS Network
hosts: servers
gather_facts: yes # 采集节点信息
become: true
tasks:
# 获取默认网卡名称,确定网卡配置文件
- name: Get default interface name
set_fact:
iface_name: "{{ ansible_default_ipv4.interface }}"
ignore_errors: true
- name: Print the detected default interface name
debug:
msg: "Default interface name is {{ iface_name }}"
ignore_errors: true
# 备份原网卡配置文件
- name: Backup original network config file
copy:
src: "/etc/sysconfig/network-scripts/ifcfg-{{ iface_name }}"
dest: "/etc/sysconfig/network-scripts/ifcfg-{{ iface_name }}.bak"
remote_src: yes
ignore_errors: true
# 使用lineinfile模块批量更改网卡配置
- name: Update network config file with static IP
lineinfile:
path: "/etc/sysconfig/network-scripts/ifcfg-{{ iface_name }}"
# 正则匹配以XXX=开头的行
regexp: '^{{ item.key }}='
# 以下面的变量更新匹配到的行,实现内容替换
line: '{{ item.key }}={{ item.value }}'
create: yes
loop:
- { key: "BOOTPROTO", value: "static" }
- { key: "IPADDR", value: "{{ new_ip }}" }
- { key: "NETMASK", value: "{{ new_netmask }}" }
- { key: "GATEWAY", value: "{{ new_gateway }}" }
- { key: "ONBOOT", value: "yes" }
ignore_errors: trueUbuntu/PVE
- name: Configure Ubuntu network with dynamic interface detection
hosts: servers
gather_facts: yes
become: true
vars:
ubuntu_interface_file: "/etc/network/interfaces"
tasks:
# 获取默认网卡名称,确定网卡配置文件
- name: Get default interface name
set_fact:
default_iface: "{{ ansible_default_ipv4.interface }}"
- name: Debug default interface name
debug:
msg: "Default interface is {{ default_iface }}"
# 备份原网卡配置文件
- name: Backup original /etc/network/interfaces
copy:
src: "{{ ubuntu_interface_file }}"
dest: "{{ ubuntu_interface_file }}.bak"
remote_src: true
ignore_errors: true
# 查找address行并替换
- name: update address
lineinfile:
path: "{{ ubuntu_interface_file }}"
regexp: '^\s*address\s+'
line: " address {{ new_ip }}/22"
insertafter: "^iface vmbr0"
ignore_errors: true
# 查找gateway行并替换
- name: update gateway
lineinfile:
path: "{{ ubuntu_interface_file }}"
regexp: '^\s*gateway\s+'
line: " gateway {{ new_gateway }}"
insertafter: "^iface vmbr0"
ignore_errors: true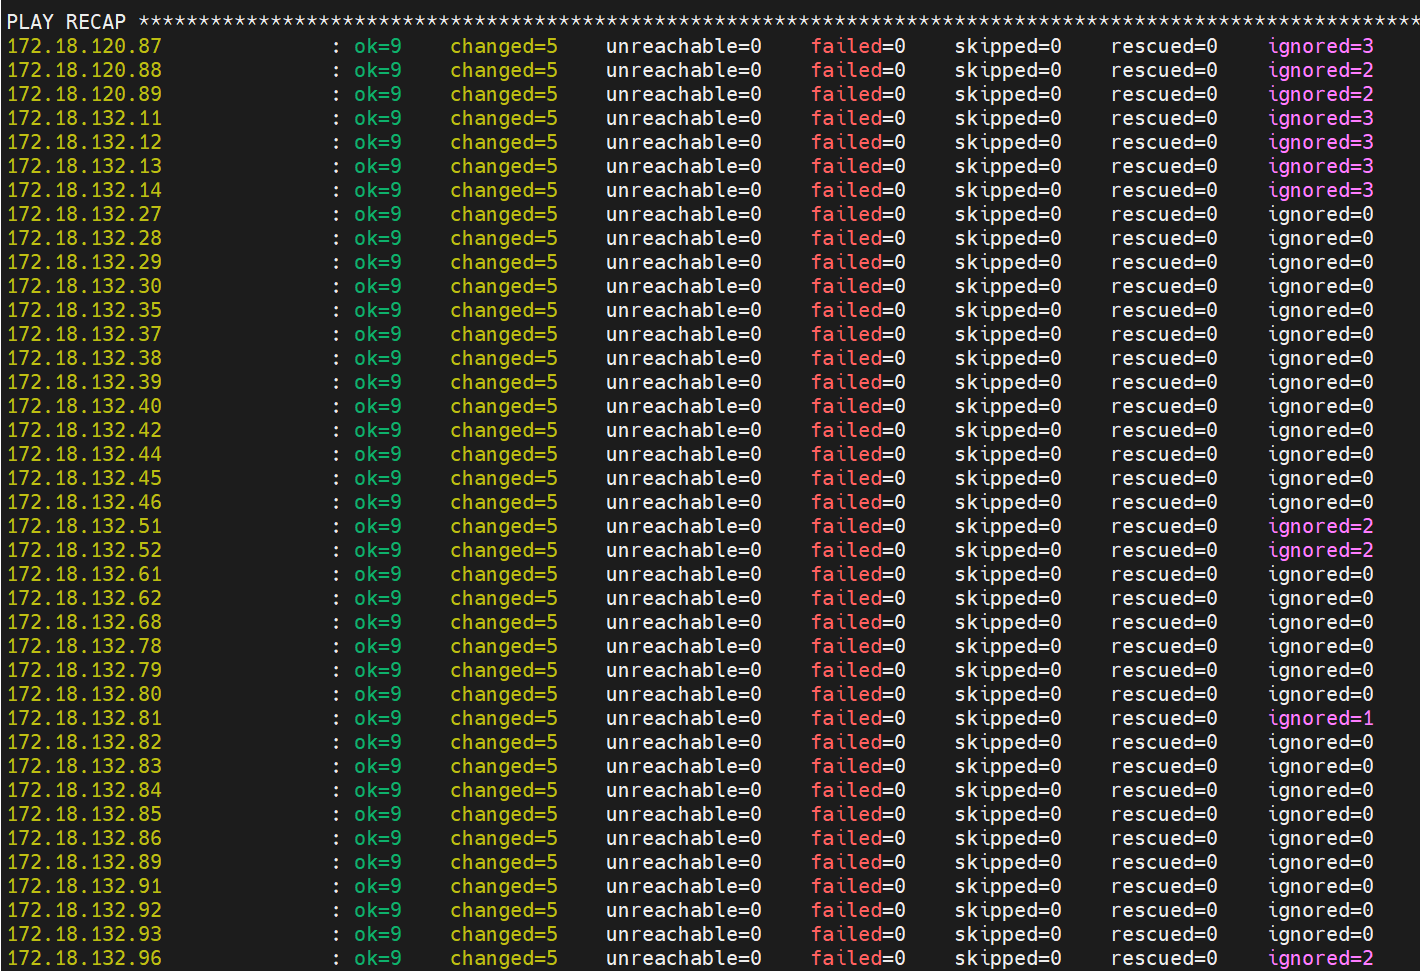
在变更完成后,我们还需要批量重启网络服务,注意区分CentOS和Ubuntu的网络服务名称。
- name: Update ipmitool
hosts: servers
gather_facts: no
become: true
tasks:
- name: Schedule network restart in 10 seconds
shell: nohup bash -c "sleep 10 && systemctl restart network" >/dev/null 2>&1 &
ignore_errors: true这里的踩坑点:如果立即重启网络服务会导致ansible的任务直接hang住,所以这里把网络服务设置为10秒后重启,这样不会影响后续任务执行。
在服务器变更完成后,网络同事介入,对服务器端口切换相应VLAN,然后我们可以写个并发ping的python脚本,用来快速检验新IP是否上线,脚本内容如下:
import platform
import subprocess
import csv
from concurrent.futures import ThreadPoolExecutor, as_completed
param = "-n" if platform.system().lower() == "windows" else "-c"
# 从文件读取 IP 地址列表
def load_ip_list(filename="ip_list.txt"):
with open(filename, "r") as f:
return [line.strip() for line in f if line.strip()]
def ping(ip):
try:
result = subprocess.run(["ping", param, "2", ip],
stdout=subprocess.DEVNULL,
stderr=subprocess.DEVNULL)
return ip, result.returncode == 0
except Exception:
return ip, False
# 开20个线程并发ping
def ping_all(ip_list, max_workers=20):
results = []
with ThreadPoolExecutor(max_workers=max_workers) as executor:
future_to_ip = {executor.submit(ping, ip): ip for ip in ip_list}
for future in as_completed(future_to_ip):
ip, status = future.result()
results.append((ip, "可达" if status else "不可达"))
print(f"{ip} -> {'可达' if status else '不可达'}")
return results
# 写入 CSV 文件
def write_to_csv(results, filename="ping_result.csv"):
with open(filename, "w", newline="", encoding="utf-8-sig") as csvfile:
writer = csv.writer(csvfile)
writer.writerow(["IP地址", "状态"])
writer.writerows(results)
print(f"结果已保存到 {filename}")
if __name__ == "__main__":
ip_list = load_ip_list("ip_list.txt")
results = ping_all(ip_list)
write_to_csv(results)根据ping结果,逐个处理特殊节点,最后再进行资产信息变更,完成收尾工作。
至此迁移工作结束,共迁移439个节点,整个迁移工作中自动化任务覆盖约85+%,成功率95+%,维护窗口由预计手动迁移的7个自然日缩短为2个工作日,大幅提升了项目进度!